Niin moni on kysellyt kuinka olen tehnyt tämän 3d albumin joka oli Magnolia Inkin numerossa 01/11. Silloin en ajan puutteen vuoksi kuvannut vaiheita (näin jälkikäteen harmittaa...) joten vihdoin tässä se nyt on:) En vain tällä kertaa viitsinyt tehdä koko albumia ihan uudelleen vaan tässä on malli ilman koristelua. Toivottavasti tästä on jotain apua teille.
So many people have asked from me how I have made this 3d album in Magnolia Ink 01/11. I was SO lazy that I didn`t bothered to do tutorial then, because I had so little time ( now I`m a little bit displeased about that). But anyway now I made it, but without embellishments:) I hope that from this is of assistance to you:)

¤ 4 cardstock 12 * 12" (30,5 * 30,5 cm), I have used Bazzill
¤ different kinds of patterned papers
¤ double sided tape and glue
¤ fastener
¤ different kinds of embellishment; flowers, charms, ribbons, laces, brads etc...

1. Piirrä kaikkiin neljään kartonkiin yllä olevan mallin mukainen kaava. Ja leikkaa sitten ääriviivoja pitkin, viivoitettu alue leikataan pois.
Draw to the all four cardstock the same as above you can see. Cut with scissors according to outliners, the hatched area is cut off.
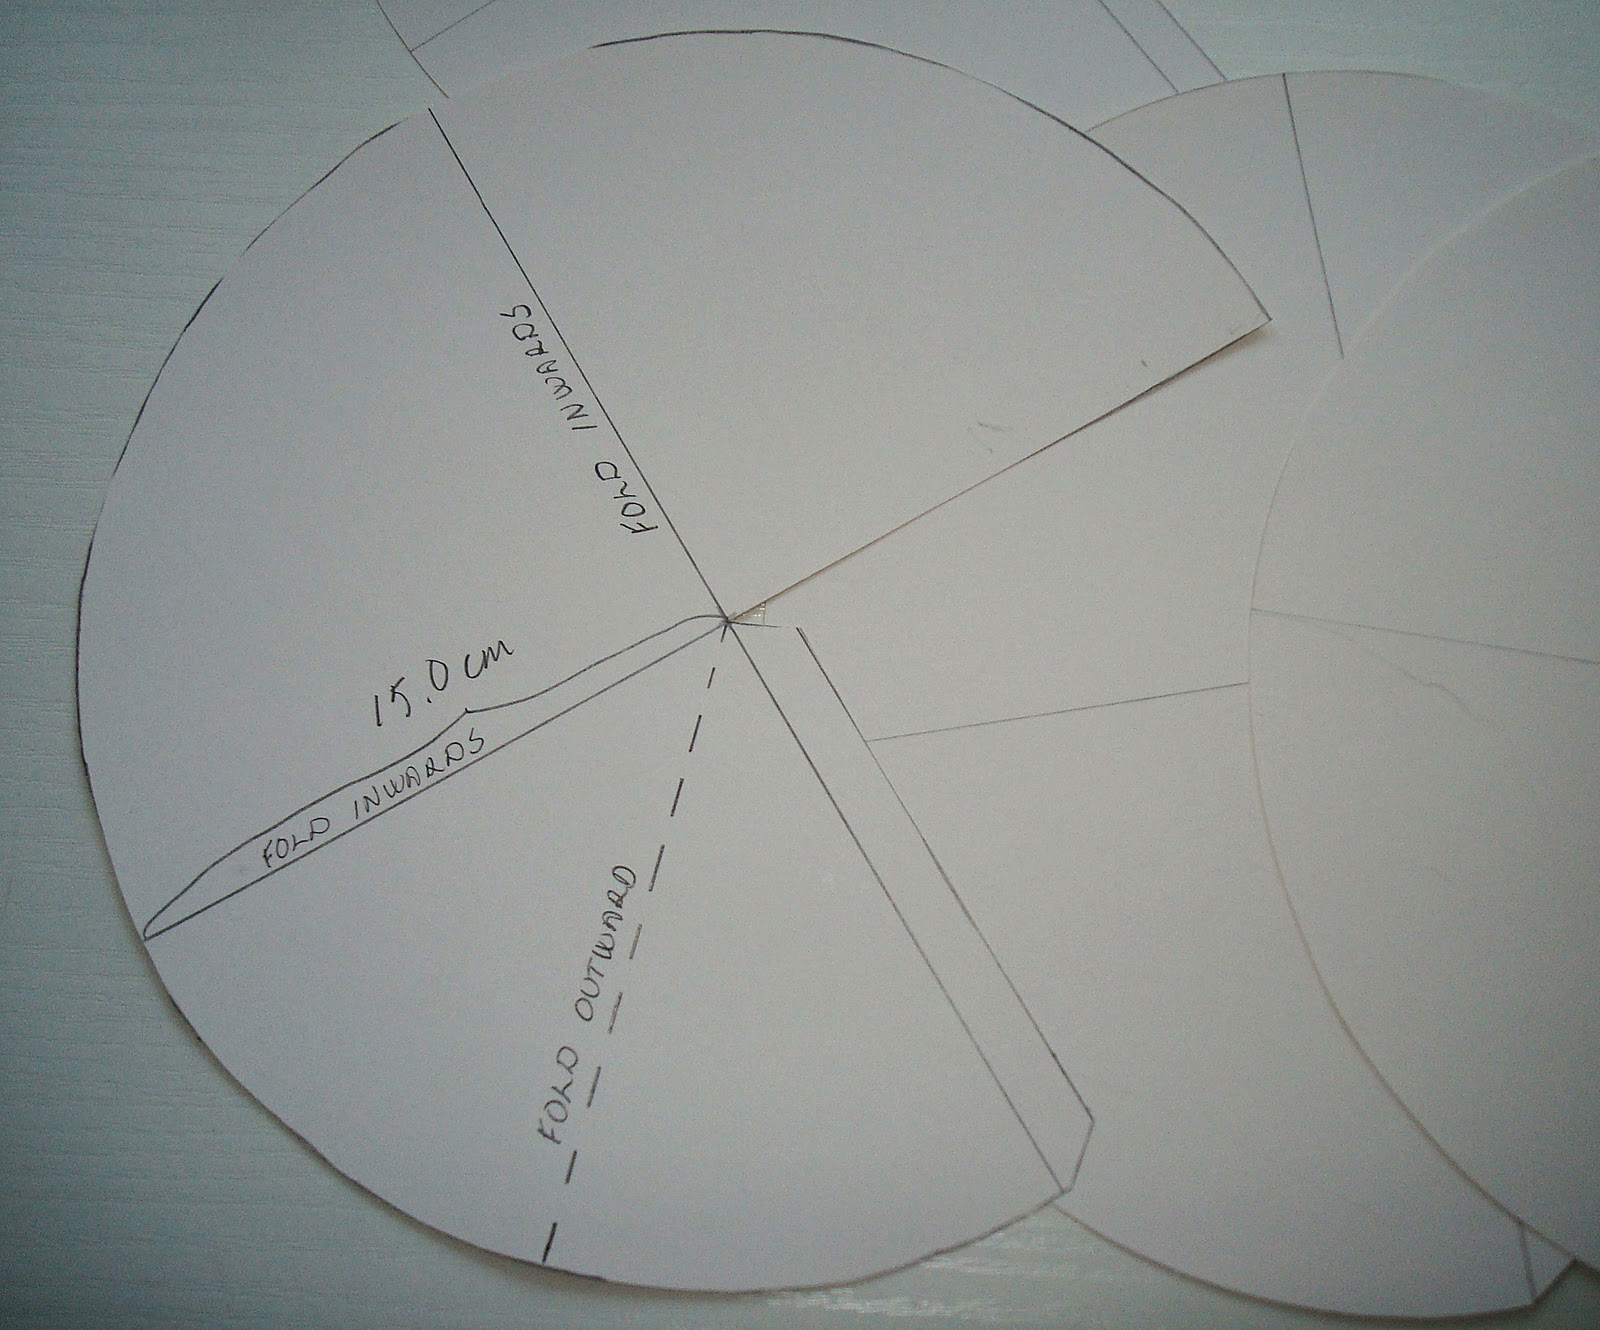
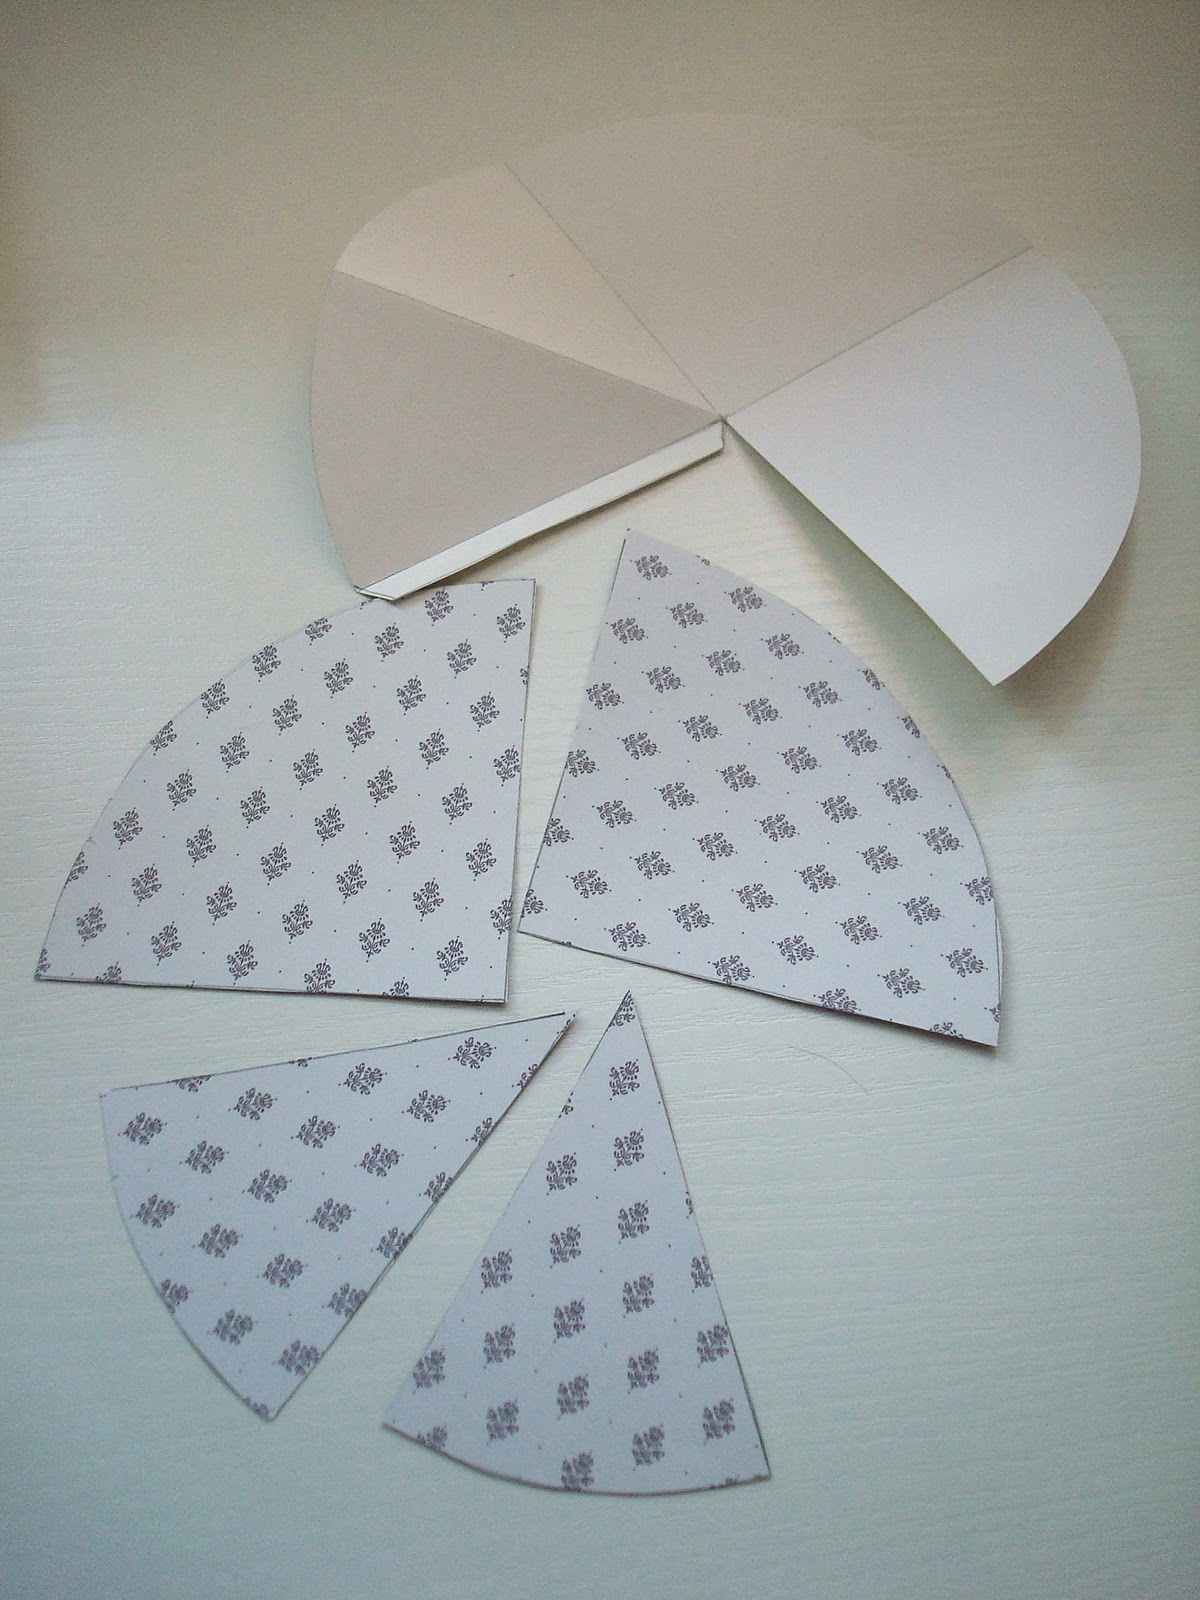
2. Nyt sinulla on tämän näköiset neljä kartonkia:) Tee taitokset mallin mukaan eli taita katkoviivalla merkitty ulospäin ja muut kaksi sisäänpäin (minä käytin Scor-Palia..).
Now you have four this kind of cardstock:) Score like above, with dashed line marked to outward and the others two inwards ( I have used Scor-Pal).

3. Nyt sinulla pitäisi olla neljä näin taiteltua osaa. Ennenkuin näitä aletaan kasaamaan yhteen , ne kannattaa koristella.
And now you should to have four, like this scored parts. Before you stick these parts up, it`s better to decorate them first.

4. Eli koristellaan jokainen ehjä neljännes ja samoin taiteltu neljännes. Voit itse valita käytätkö samanlaista paperia vai jokaiseen neljännekseen erilaista. Tässä vaiheessa päätät mitkä sivut tulevat etu- ja takakanneksi. Kiinnitä niihin nauhat kartongin ja kuviopaperin väliin. Näillä nauhoilla etu- ja takakannen voi sitoa yhteen , jotta albumi pysyy auki. Nauhoja ja pitsiä voi laittaa myös muihin väleihin, kuten minä olin tehnyt Magnolian albumiin.
Ja sitte vielä kukkia, haaraniittejä mitä vain haluat...
So now you will decorate every entire 1/4 (guarter) and scored 1/4. You can choice yourself will you use different kinds of or the same papers to every 1/4. At this point you will decide which pages will come to front- and back cover. Fasten the ribbons to them, between the cardstock and patterned paper. And with these ribbons you can tie the ribbons together so that the album stay open. You can put the ribbons and laces on to the other betweens, too, such as I have made on to my Magnolia`s album.
And then flowers, brads and whatever you want...

5. Kun kaikki osat on koristeltu on vuorossa kiinnittäminen. Kiinnitä läppään kaksipuoleinen teippi ja paina läppä toisen neljänneksen taakse. Tee sama kaikille neljälle kartongille,kuten yllä. ÄLÄ KUITENKAAN KIINNITÄ ETU- JA TAKAKANTTA YHTEEN.
After all parts are decorated, the next thing is attaching. Fasten to the flap the double sided tape and press the flap to the second quarter`s backbround. Do the same for all four cardstock, like above. DON´T FASTEN THE FRONT- AND BACK COVER TOGETHER.

6. Kiinniä lopuksi kaikki neljä kolmisivuista osaa yhteen kaksipuolisella teipillä samalla tavoin kuin näissä kuvissa. Tässä ylempänä kaksi osaa kiinnitetty.
And the end, fasten all the four three-paged part together with double sided tape the same way like these photos.
In this picture above, two parts are fastened together.

7. Ja tässä nämä kaksi takapuolelta.
And here the same two from back side.

8. Tässä kolme osaa kiinnitetty.
Here is three parts fastened.


9. Ja tässä kaikki neljä.
And here all the four.
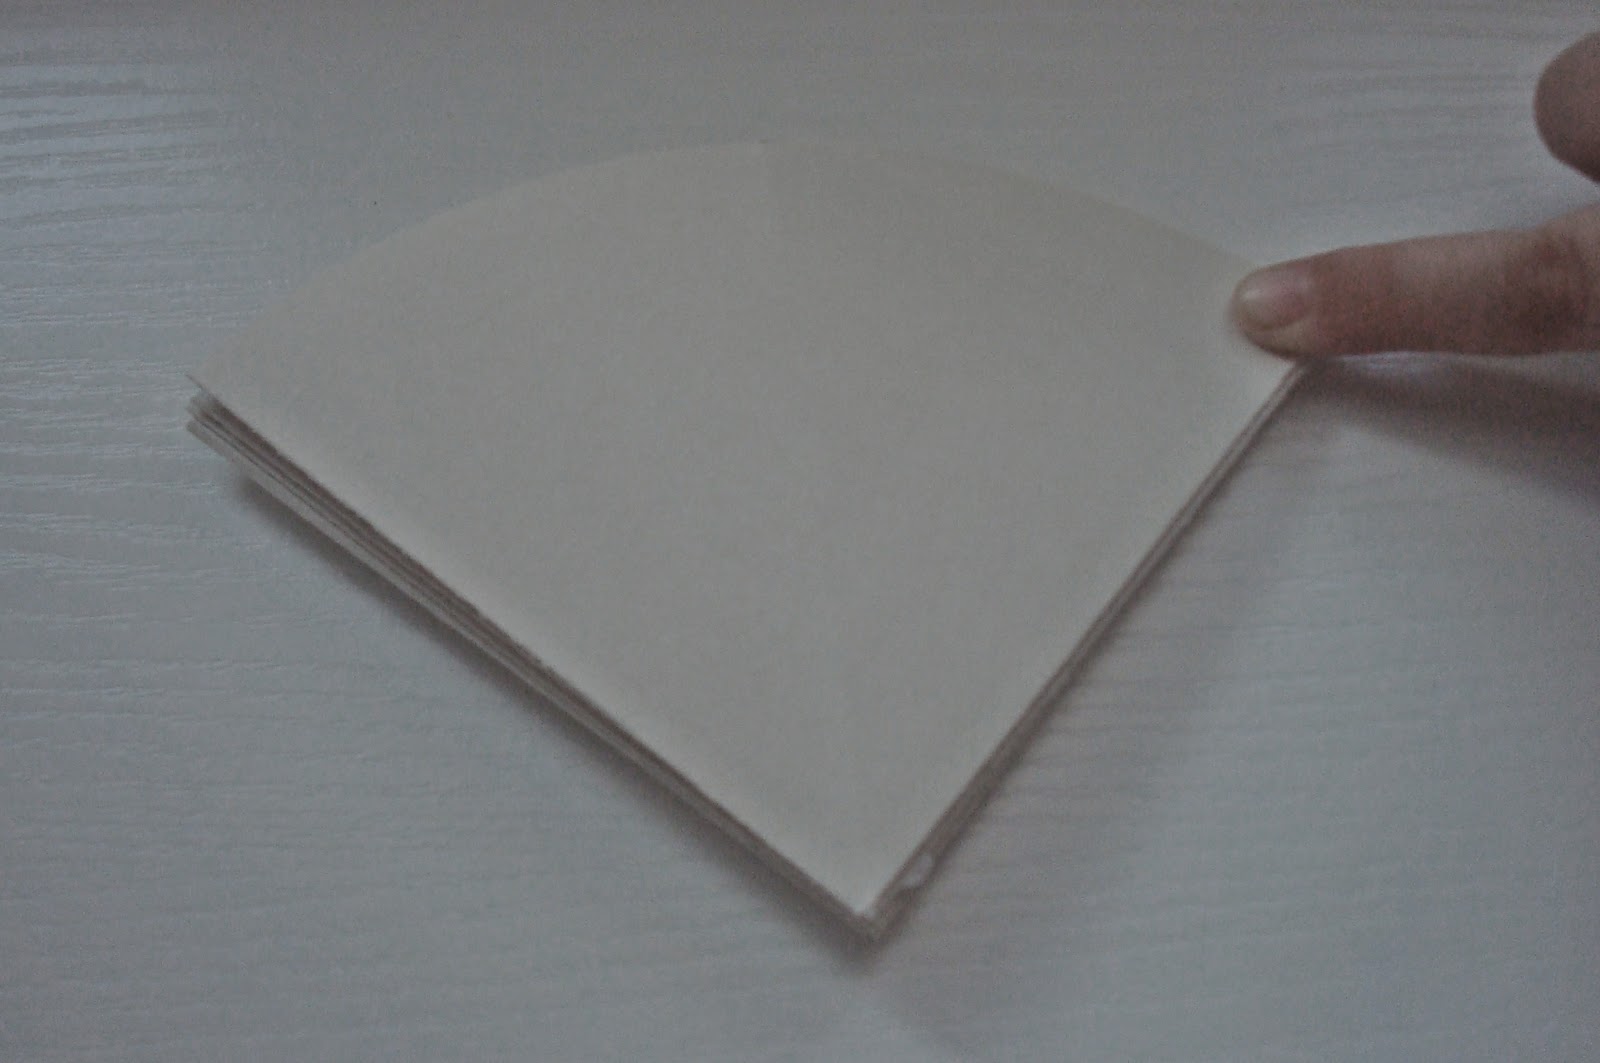
10. Albumi pitäisi pystyä taittamaan näin.
You should to fold the album like this.


Ja lopuksi muutamia kuvia. Toivottavasti ymmärsitte, mutta kysykää jos on jotain epäselvää.
And the end some photos. I really hope that you understood, but please, ask if there was some difficulties.


1 kommenttia:
Wau-ompa hieno ohje ja idea-herättelee ajatuksia -mitä kaikkea noin voisikaan tehdä--
Lähetä kommentti